Dylan Meeus September 20, 2016
Learn how to set up a Spring Boot project using Java, and secure it with JWTs.
The approach exposed in this article is out-of-date and is left here for reference only. Please, check out a better and up-to-date approach on how to secure Spring Boot applications with JWTs here.
TL;DR: Spring Boot is a technology that makes it easy to create Java and Groovy applications utilizing the full power of Spring, with minimal setup. It allows you to create applications that 'just run' without hassle; and even the project setup becomes a breeze. Read on to find out how to set up a fully-functioning project and secure it with JWT in almost no time!
Spring Boot Overview
Spring Boot is a technology from Pivotal, known for giving us the powerful Spring framework. With Spring Boot, they offer an easy way to set up a project and get it running in no time. They took the approach of valuing convention over configuration, meaning that you will spend a lot less time struggling with the setup and more time focusing on what is unique about your project. Along with having an embedded Tomcat, Jetty, or Undertow, a large number of possible the deployment issues have been eliminated, causing most applications to 'just run'.
Above all, Spring Boot is meant to make it easy to get a project running, starting all the way at the beginning by providing multiple ways to set up a Spring Boot project. Let's jump right into setting up our project and getting our'Hello World'!
If you can't wait to see the result, feel free to check out the full code on this GitHub repository.
Setting Up the Spring Boot Project
There are various ways to get started with a Spring Boot project. They provide both a quick start and a CLI tool. If we didn't want to use those, we could also set up a project with Spring Boot manually, using either Maven or Gradle and adding the necessary dependencies ourselves. In this post we will set up a project using the quick start approach, which can be found at start.spring.io.
When we head over to the quick start webpage, we are presented with a few options on the main page. We will generate a Maven project with the latest version of Spring Boot (1.5.2 last time I checked). With the Project Metadata we could set up the standard properties of a Maven artifact, but we'll just leave it at the default for now.
Next, we can search for dependencies. Searching for dependencies is a handy feature once you have used Spring Boot several times and are aware of the available dependencies. Because this is our first project, however, we can click on the link at the bottom that says switch to full version. After doing this, we have a webpage with checkboxes for all the available dependencies. Because we want to create a web project, we'll tick that checkbox under the web heading.
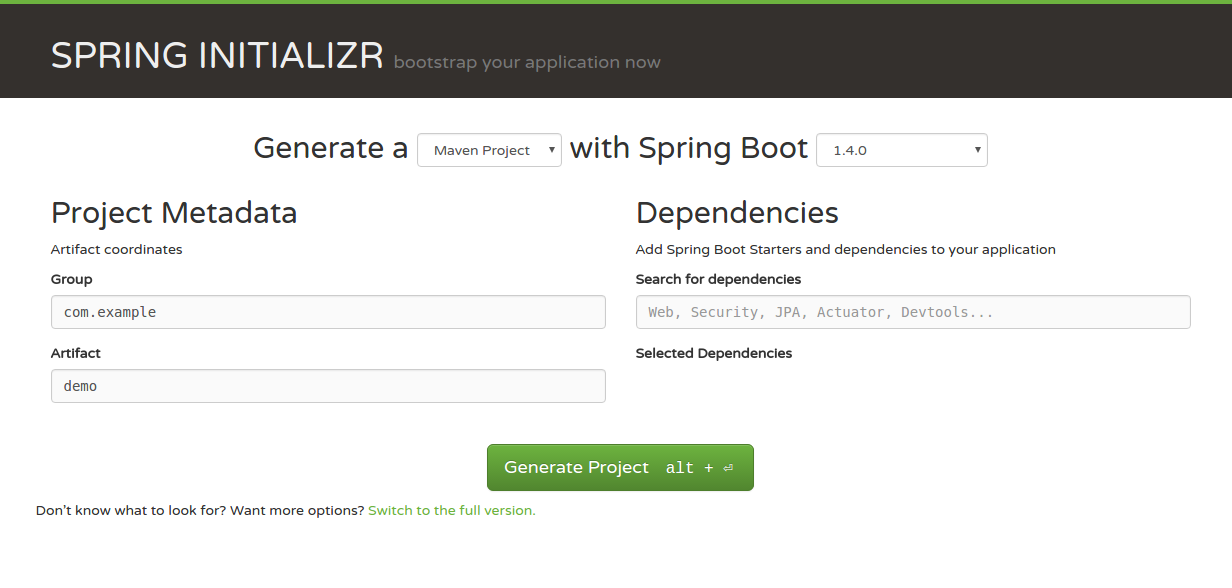
There are a lot of dependencies available that work with Spring Boot out of the box. Many of the common technologies are provided here, such as dependencies for HATEOAS, JPA, MongoDB, and Thymeleaf. If we are going to use one of the common Java technologies, chances are good that it can easily be included in our Spring Boot project.
For now, all we really need is the Web dependency, which gives us several things including a Tomcat server and the Spring MVC framework. Once we click on the Generate Project button, a download containing a starting project for our selected setup will start. Setting up a Spring Boot project really is just a matter of minutes!
Our First Spring Boot Application
Once we have downloaded our zip file, the project can be imported into our favorite editor. At this point, some code is already generated for us. Let's first take a look at some of the code, to understand what Spring Boot has prepared for us.
As this is a Maven project, we will examine the pom.xml file first. The top of the file is pretty much a standard pom file. It identifies our project by the groupId and the artifactId. Our project also has a name and a description. Next, there is a reference to a parent. This is the parent of all Spring Boot starters, and contains further dependencies needed for the base of Spring Boot. Also, the version tag of the parent, defines the Spring Boot version that we are using.
This is followed by the properties, which tells us something more about the project. Because we have chosen Java 8, the properties also reflect this in the java.version tag.
Here comes the interesting part:
<dependencies>
    <dependency>
        <groupId>org.springframework.boot</groupId>
        <artifactId>spring-boot-starter-web</artifactId>
    </dependency>

    <dependency>
        <groupId>org.springframework.boot</groupId>
        <artifactId>spring-boot-starter-test</artifactId>
        <scope>test</scope>
    </dependency>
</dependencies>

<build>
    <plugins>
        <plugin>
            <groupId>org.springframework.boot</groupId>
            <artifactId>spring-boot-maven-plugin</artifactId>
        </plugin>
    </plugins>
</build>
The dependencies presented here are the ones that were selected during the setup. Because we only selected the Web dependency, we will see both Web and Test dependencies (_Test_ is provided by default, for unit testing our application). Although it might look like there are not a lot of dependencies being pulled in, that's not quite the case. The spring-boot-starter-... dependencies that we enter here actually fetch other dependencies they need. Because this is invisible to us, the pom.xml file looks quite clean, and all the management of those dependencies is taken care of for us as well.
Next, there is one plugin, the spring-boot-maven-plugin. This will let us build and deploy the entire application with one simple Maven command:mvn spring-boot:run. If we try to run this now, there won't be anything interesting yet. After running that command, we can go to localhost:8080, though all we will see is a "Whitelabel Error Page". But, if all went well, the compilation worked without any problems and our server is up and running. Time to start doing something interesting with it!
Creating a Web Application
In this part, we will set up a small application that will accept HTTP requests on various paths and return data. To keep this example concise, all the information will be statically provided. At first, we will just expose all the data to everyone; then we will secure some routes with a JWT and provide a login mechanism.
For starters, we will just create a mapping against the root (/) of our webserver in order to verify that this is working; afterwards we can add more specific routes for the various functions that we will offer. When we want to make methods for certain paths, we need to create a RestController. For now we will use our only class for this, and we will add the RestController and EnableAutoConfiguration annotations to this class. The class should be called DemoApplication and it is the only class with a main method.
package com.example;

import org.springframework.boot.SpringApplication;
import org.springframework.boot.autoconfigure.EnableAutoConfiguration;
import org.springframework.boot.autoconfigure.SpringBootApplication;
import org.springframework.web.bind.annotation.RequestMapping;
import org.springframework.web.bind.annotation.RestController;

@SpringBootApplication
@RestController
@EnableAutoConfiguration
public class DemoApplication {

    @RequestMapping("/")
    String hello() {
        return "hello world";
    }

    public static void main(String[] args) {
        SpringApplication.run(DemoApplication.class, args);
    }
}
When we run our application, by using mvn spring-boot:run, we can navigate to localhost:8080, and are presented with a "Hello World" message. An alternative approach would be to use a CLI tool like curl or the postman application to send requests to the webserver. When dealing with JWTs, postman offers an incredibly convenient way to test our application.
Now we will extend this example a little bit. We will create a new class UserController, which will be once again annotated with @RestController. We will return some static JSON data at route /users to begin with.
package com.example;

import org.springframework.web.bind.annotation.RequestMapping;
import org.springframework.web.bind.annotation.ResponseBody;
import org.springframework.web.bind.annotation.RestController;

@RestController
public class UserController {

  /* Maps to all HTTP actions by default (GET,POST,..)*/
  @RequestMapping("/users")
  public @ResponseBody String getUsers() {
    return "{\"users\":[{\"firstname\":\"Richard\", \"lastname\":\"Feynman\"}," +
           "{\"firstname\":\"Marie\",\"lastname\":\"Curie\"}]}";
  }
}
We have some pretty similar code to our original 'Hello World', but now we are returning JSON-encoded data. For this reason, the @ResponseBody annotation has been added. With this annotation, when a request specifies in the headers that it wants to accept application/json, the data will be returned to the client as JSON. When testing this with postman, the returned data look like this:
 {
     "user": [{
         "firstname": "Richard",
         "lastname": "Feynman"
     }, {
         "firstname": "Marie",
         "lastname": "Curie"
     }]
 }
Securing Spring Boot Application With JWT
A better and easier way on how to secure Spring Boot with JWTs is explained here. Take a look!
At this point, our application is exposed to everyone. Anyone can query our webserver and request a list of all the users. We'd prefer that it's only exposed to people who are logged in. For this purpose, we will secure our application with JSON Web Tokens (JWTs).
JWT is a relatively new technology, defined in rfc-7519. It defines a compact, URL-safe way of sharing data between parties using a JSON object. The information is signed with either a secret (using an HMAC) or a public/private key-pair using RSA. If you want to learn more about JWTs, we've got you covered!
Adding Secure Routes
The first step is to secure some routes of our application. For this demo we will expose the routes / and /login to everyone, and only expose /users to people whom can provide a valid JWT token. To achieve this, we start by adding spring-boot-starter-security to our pom.xml. This will give us the necessary classes to start working with authentication in Spring Boot. In addition, we will add a dependency to manage our JWTs.
<dependency>
    <groupId>org.springframework.boot</groupId>
    <artifactId>spring-boot-starter-security</artifactId>
</dependency>

<dependency>
    <groupId>io.jsonwebtoken</groupId>
    <artifactId>jjwt</artifactId>
    <version>0.7.0</version>
</dependency>
Once we have updated the pom.xml file and imported the new dependencies, we are ready to start securing our routes. First of all, we want to avoid exposing /users to everyone, so we will create a configuration that restricts its access. We will accomplish this by adding a new class called WebSecurityConfig that extends the WebSecurityConfigurerAdapter class from Spring Security. Let's add this new class, under a new package called com.example.security, with the following content:
package com.example.security;

import org.springframework.context.annotation.Configuration;
import org.springframework.http.HttpMethod;
import org.springframework.security.config.annotation.authentication.builders.AuthenticationManagerBuilder;
import org.springframework.security.config.annotation.web.builders.HttpSecurity;
import org.springframework.security.config.annotation.web.configuration.EnableWebSecurity;
import org.springframework.security.config.annotation.web.configuration.WebSecurityConfigurerAdapter;
import org.springframework.security.web.authentication.UsernamePasswordAuthenticationFilter;

@Configuration
@EnableWebSecurity
public class WebSecurityConfig extends WebSecurityConfigurerAdapter {
  @Override
  protected void configure(HttpSecurity http) throws Exception {
    http.csrf().disable().authorizeRequests()
        .antMatchers("/").permitAll()
        .antMatchers(HttpMethod.POST, "/login").permitAll()
        .anyRequest().authenticated()
        .and()
        // We filter the api/login requests
        .addFilterBefore(new JWTLoginFilter("/login", authenticationManager()),
                UsernamePasswordAuthenticationFilter.class)
        // And filter other requests to check the presence of JWT in header
        .addFilterBefore(new JWTAuthenticationFilter(),
                UsernamePasswordAuthenticationFilter.class);
  }

  @Override
  protected void configure(AuthenticationManagerBuilder auth) throws Exception {
    // Create a default account
    auth.inMemoryAuthentication()
        .withUser("admin")
        .password("password")
        .roles("ADMIN");
  }
}
Here we have decided that everyone can access the / route, and that the /login route is only publicly available for POST requests. For all other routes, authentication is required. You may have noted that the JWTLoginFilter class and the JWTAuthenticationFilter class are missing. We will create them soon, but their goal is to filter for the /login route, and every other route, to decide what should happen when someone access these routes. In this class, we also added a default account that we can use to test our application.
The great thing here is that we have now secured our application without having to change code for existing routes. We did not alter our previously created UserController, nor did we have to write any xml-configuration.
The classes JWTLoginFilter and JWTAuthenticationFilter will handle logging in and authenticating users, respectively. Before we can use these classes, however, we need to create a class that can handle JWTs.
Creating a JWT Service on Spring Boot
Our JWT service will deal with the creation and verification of our tokens. In this example, we will create a token based on a username and an expiration time, and then sign it with a secret (using an HMAC). We will use io.jsonwebtoken.Jwts here for creating and verifying our tokens; they also provide a bunch of algorithms we can use to sign our secret.
For this, let's create a new class called TokenAuthenticationService, under the com.example.security, with the following code:
package com.example.security;

import io.jsonwebtoken.Jwts;
import io.jsonwebtoken.SignatureAlgorithm;
import org.springframework.security
            .authentication.UsernamePasswordAuthenticationToken;
import org.springframework.security.core.Authentication;

import javax.servlet.http.HttpServletRequest;
import javax.servlet.http.HttpServletResponse;
import java.util.Date;

import static java.util.Collections.emptyList;

class TokenAuthenticationService {
  static final long EXPIRATIONTIME = 864_000_000; // 10 days
  static final String SECRET = "ThisIsASecret";
  static final String TOKEN_PREFIX = "Bearer";
  static final String HEADER_STRING = "Authorization";

  static void addAuthentication(HttpServletResponse res, String username) {
    String JWT = Jwts.builder()
        .setSubject(username)
        .setExpiration(new Date(System.currentTimeMillis() + EXPIRATIONTIME))
        .signWith(SignatureAlgorithm.HS512, SECRET)
        .compact();
    res.addHeader(HEADER_STRING, TOKEN_PREFIX + " " + JWT);
  }

  static Authentication getAuthentication(HttpServletRequest request) {
    String token = request.getHeader(HEADER_STRING);
    if (token != null) {
      // parse the token.
      String user = Jwts.parser()
          .setSigningKey(SECRET)
          .parseClaimsJws(token.replace(TOKEN_PREFIX, ""))
          .getBody()
          .getSubject();

      return user != null ?
          new UsernamePasswordAuthenticationToken(user, null, emptyList()) :
          null;
    }
    return null;
  }
}
Authenticating with JWTs
We now have everything set up to use JWTs in our authentication process. We'll first take a look at the JWTLoginFilter class. This class will intercept POST requests on the /login path and attempt to authenticate the user. When the user is successfully authenticated, it will return a JWT in the Authorization header of the response. Let's create this class, under the com.example.security package, with the following content:
package com.example.security;

import com.fasterxml.jackson.databind.ObjectMapper;
import org.springframework.security.authentication.AuthenticationManager;
import org.springframework.security.authentication.UsernamePasswordAuthenticationToken;
import org.springframework.security.core.Authentication;
import org.springframework.security.core.AuthenticationException;
import org.springframework.security.web.authentication.AbstractAuthenticationProcessingFilter;
import org.springframework.security.web.util.matcher.AntPathRequestMatcher;

import javax.servlet.FilterChain;
import javax.servlet.ServletException;
import javax.servlet.http.HttpServletRequest;
import javax.servlet.http.HttpServletResponse;
import java.io.IOException;
import java.util.Collections;

public class JWTLoginFilter extends AbstractAuthenticationProcessingFilter {

  public JWTLoginFilter(String url, AuthenticationManager authManager) {
    super(new AntPathRequestMatcher(url));
    setAuthenticationManager(authManager);
  }

  @Override
  public Authentication attemptAuthentication(
      HttpServletRequest req, HttpServletResponse res)
      throws AuthenticationException, IOException, ServletException {
    AccountCredentials creds = new ObjectMapper()
        .readValue(req.getInputStream(), AccountCredentials.class);
    return getAuthenticationManager().authenticate(
        new UsernamePasswordAuthenticationToken(
            creds.getUsername(),
            creds.getPassword(),
            Collections.emptyList()
        )
    );
  }

  @Override
  protected void successfulAuthentication(
      HttpServletRequest req,
      HttpServletResponse res, FilterChain chain,
      Authentication auth) throws IOException, ServletException {
    TokenAuthenticationService
        .addAuthentication(res, auth.getName());
  }
}
During the authentication attempt, which is dealt by the attemptAuthentication method, we retrieve the username and password from the request. After they are retrieved, we use the AuthenticationManager to verify that these details match with an existing user. If it does, we enter the successfulAuthentication method. In this method we fetch the name from the authenticated user, and pass it on to TokenAuthenticationService, which will then add a JWT to the response.
Now we will implement the JWTAuthenticationFilter class. Let's create this class, under the same com.example.security package, with the following content:
package com.example.security;

import org.springframework.security.core.context.SecurityContextHolder;
import org.springframework.web.filter.GenericFilterBean;
import org.springframework.security.core.Authentication;
import javax.servlet.FilterChain;
import javax.servlet.ServletException;
import javax.servlet.ServletRequest;
import javax.servlet.ServletResponse;
import javax.servlet.http.HttpServletRequest;
import java.io.IOException;

public class JWTAuthenticationFilter extends GenericFilterBean {

  @Override
  public void doFilter(ServletRequest request,
             ServletResponse response,
             FilterChain filterChain)
      throws IOException, ServletException {
    Authentication authentication = TokenAuthenticationService
        .getAuthentication((HttpServletRequest)request);

    SecurityContextHolder.getContext()
        .setAuthentication(authentication);
    filterChain.doFilter(request,response);
  }
}
What this filter does is to intercept all requests to validate the presence of the JWT–that is, the ones that are not issued to / nor /users. This validation is done with the help of the TokenAuthenticationService class.
We need just one extra class: the AccountCredentials class. This will be used to map request data when a POST call is made to /login path. The request data should contain the username and password as part of the body. Let's create this class, under the same com.example.security package, with the following content:
package com.example.security;

public class AccountCredentials {

  private String username;
  private String password;
  // getters & setters
}
Running the Spring Boot Application
Our Spring Boot application is now secured and supports authentication with JWTs, so we can go ahead and run our application again. When our server is up and running, we can test this out by querying http://localhost:8080/users, and we should get a message saying "Access Denied." To authenticate ourselves, we will send a POST request to /login with our user's credentials in the body: {"username":"admin","password":"password"}.
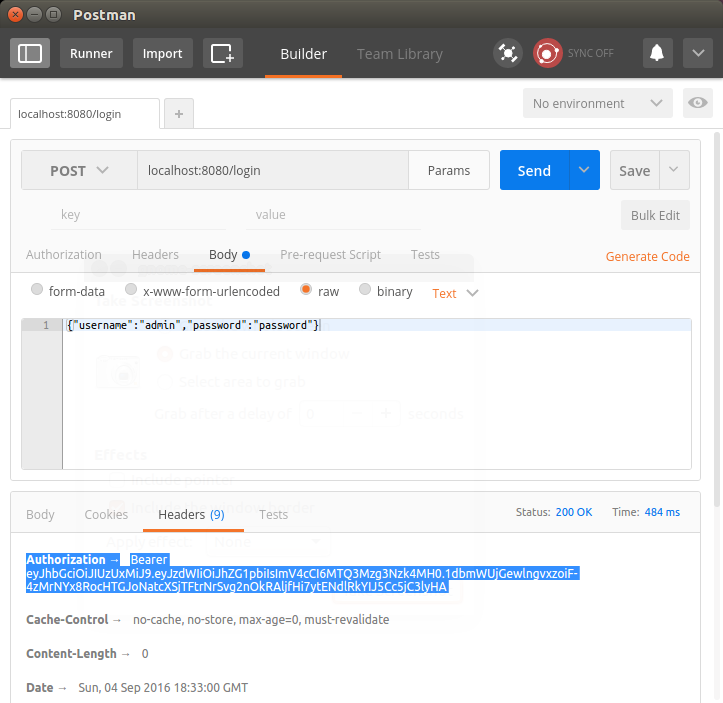
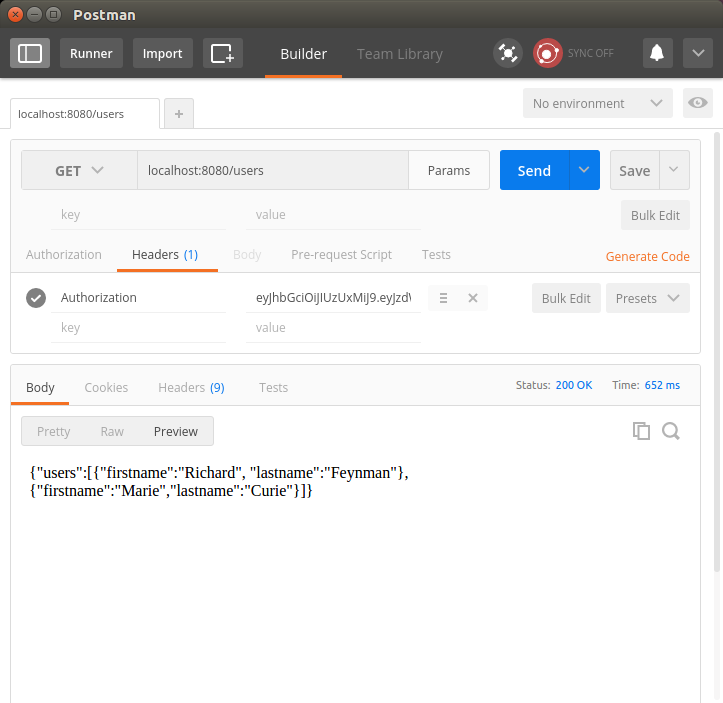
In the response to this request, we will get a token as part of the Authorization header, prefixed by "Bearer". We can copy this token, with the Bearer prefix, to issue GET requests to our /users path. To do this, alter the request to /users to include a header called Authorization, paste the JWT received when logging in, and launch the request. If all went well, we should once again be presented with the users.
Advantages of Spring Boot
Now that we've completed our Spring Boot application, let's reflect on the advantages this framework gave us:
Fast development: Setting up the project took us just a few minutes, getting it to run just a few more.
Many dependencies managed for us: While we still had to alter our pom.xml file, we did not have to include too many dependencies. Most of them are added on build time by Maven as dependencies to Spring Boot default libs. Issues of incompatible dependencies are largely gone because of this.
No XML configuration: At no point did we have to write XML configuration files: all configuration was done from within Java files by the use of annotations and existing classes and methods.
Self-contained applications: The applications we can make with Spring Boot are self-contained. We can simply run the application using one simple command, and the deployment (containing a webserver) is done for us.
Leverage a mature framework: Spring Boot can leverage the power of the mature Spring framework, which is something many Java developers are already familiar with, making adoption of Spring Boot more convenient!
Well documented: Being well documented is important, and Pivotal has great documentation on how to get started with Spring Boot and Spring. If you're curious about learning more, you should check out the Getting Started Guides.
Spring Boot and MicroServices
One of the advantages of Spring Boot lies with microservices. Microservices are a successor of the SOA, service oriented architecture. A microservice is responsible for managing a single data domain and the functions thereof. Spring Boot is actually a great example of this principle, as it consists of many different modules that we can use. Recall that during the setup of our application, we could choose between a whole range of these dependencies, dependencies that could be added to our project by including a simple reference to them in our pom.xml file. Each of these dependencies can be thought of as a microservice. Each project would function as a self-contained service that we could then use in other projects.
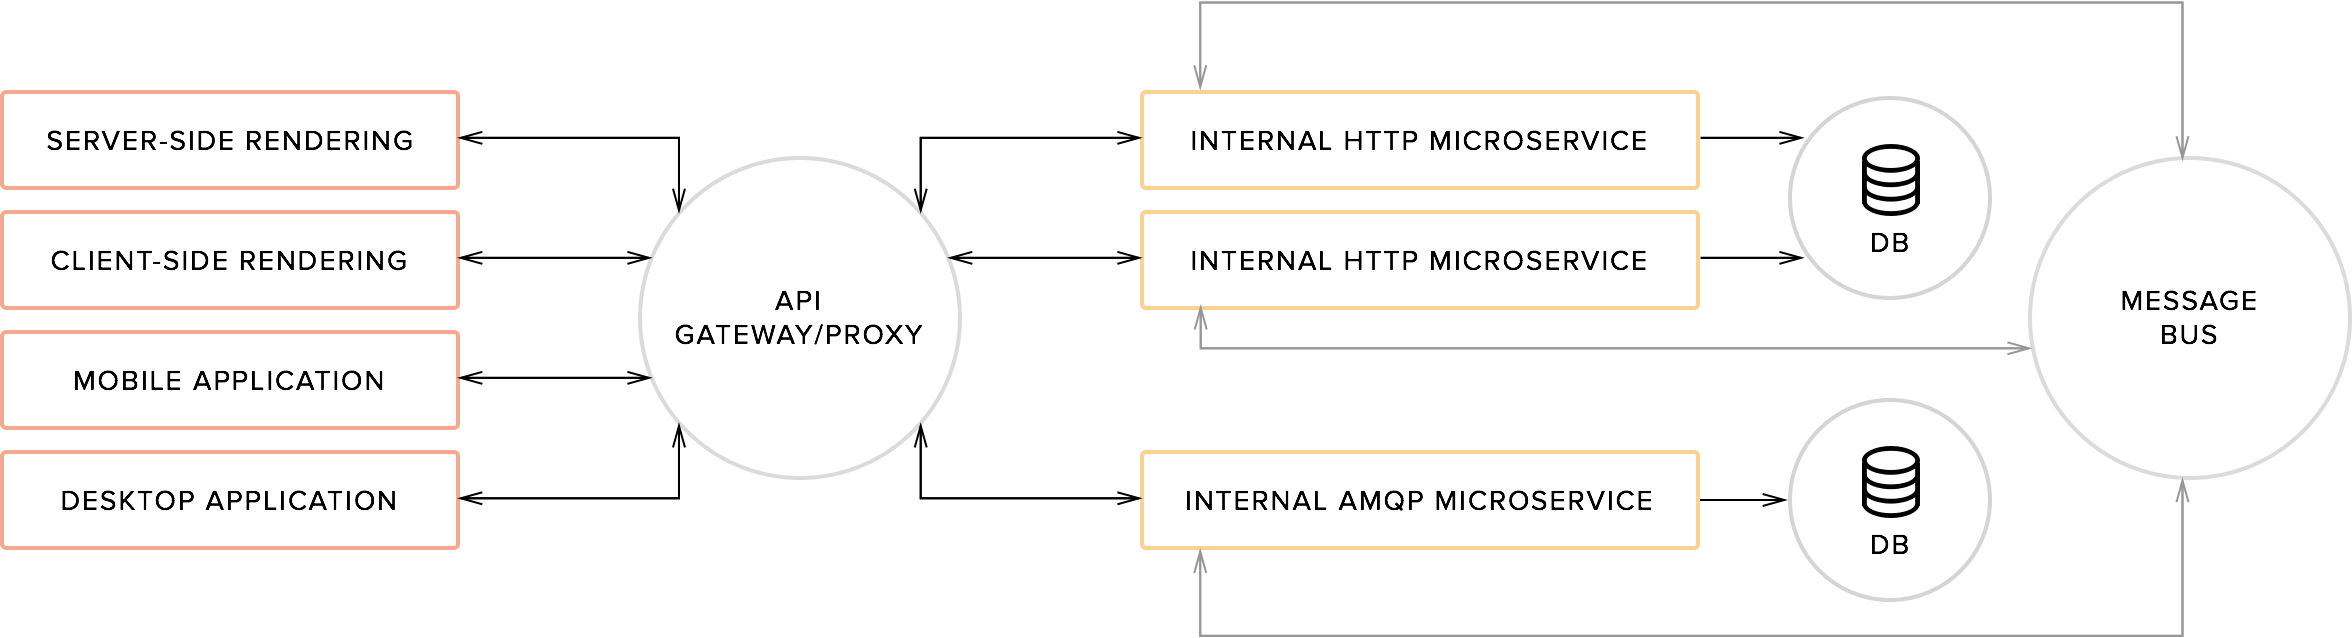
Typical microservices diagram
In our example, we have created a REST service that is self-contained. We could focus on writing just the REST api that deals with logging in and retrieving a list of users. We could then create another Spring Boot project for another part of our application (say, for example, a JSP application or desktop client), if we were so inclined. These Spring Boot applications could then communicate with each other via HTTP, but would be largely independent of each other. This all makes Spring Boot a popular choice in modern architectures, and one worth checking out!
Aside: Using Spring Boot with Auth0
Securing Spring Boot APIs with Auth0 is an easy task, as we will see, and brings a lot of great features to the table. With Auth0 we have to write just a few lines of code to get a solid identity management solution, including single sign-on, user management, support for social identity providers (like Facebook, GitHub, Twitter, etc.), enterprise (Active Directory, LDAP, SAML, etc.), and your own database of users.
For starters, if you haven't done so yet, this is a good time to sign up for a free Auth0 account. Having an Auth0 account, the first thing that we must do is to create a new API on the dashboard. An API is an entity that represents an external resource, capable of accepting and responding to protected resource requests made by client applications. And this is exactly what the Spring Boot app that we just built is, an API.
Note, if you don't already have the APIs menu item, you can enable it by going to your Account Settings and in the Advanced tab, scroll down until you see Enable APIs Section and flip the switch.
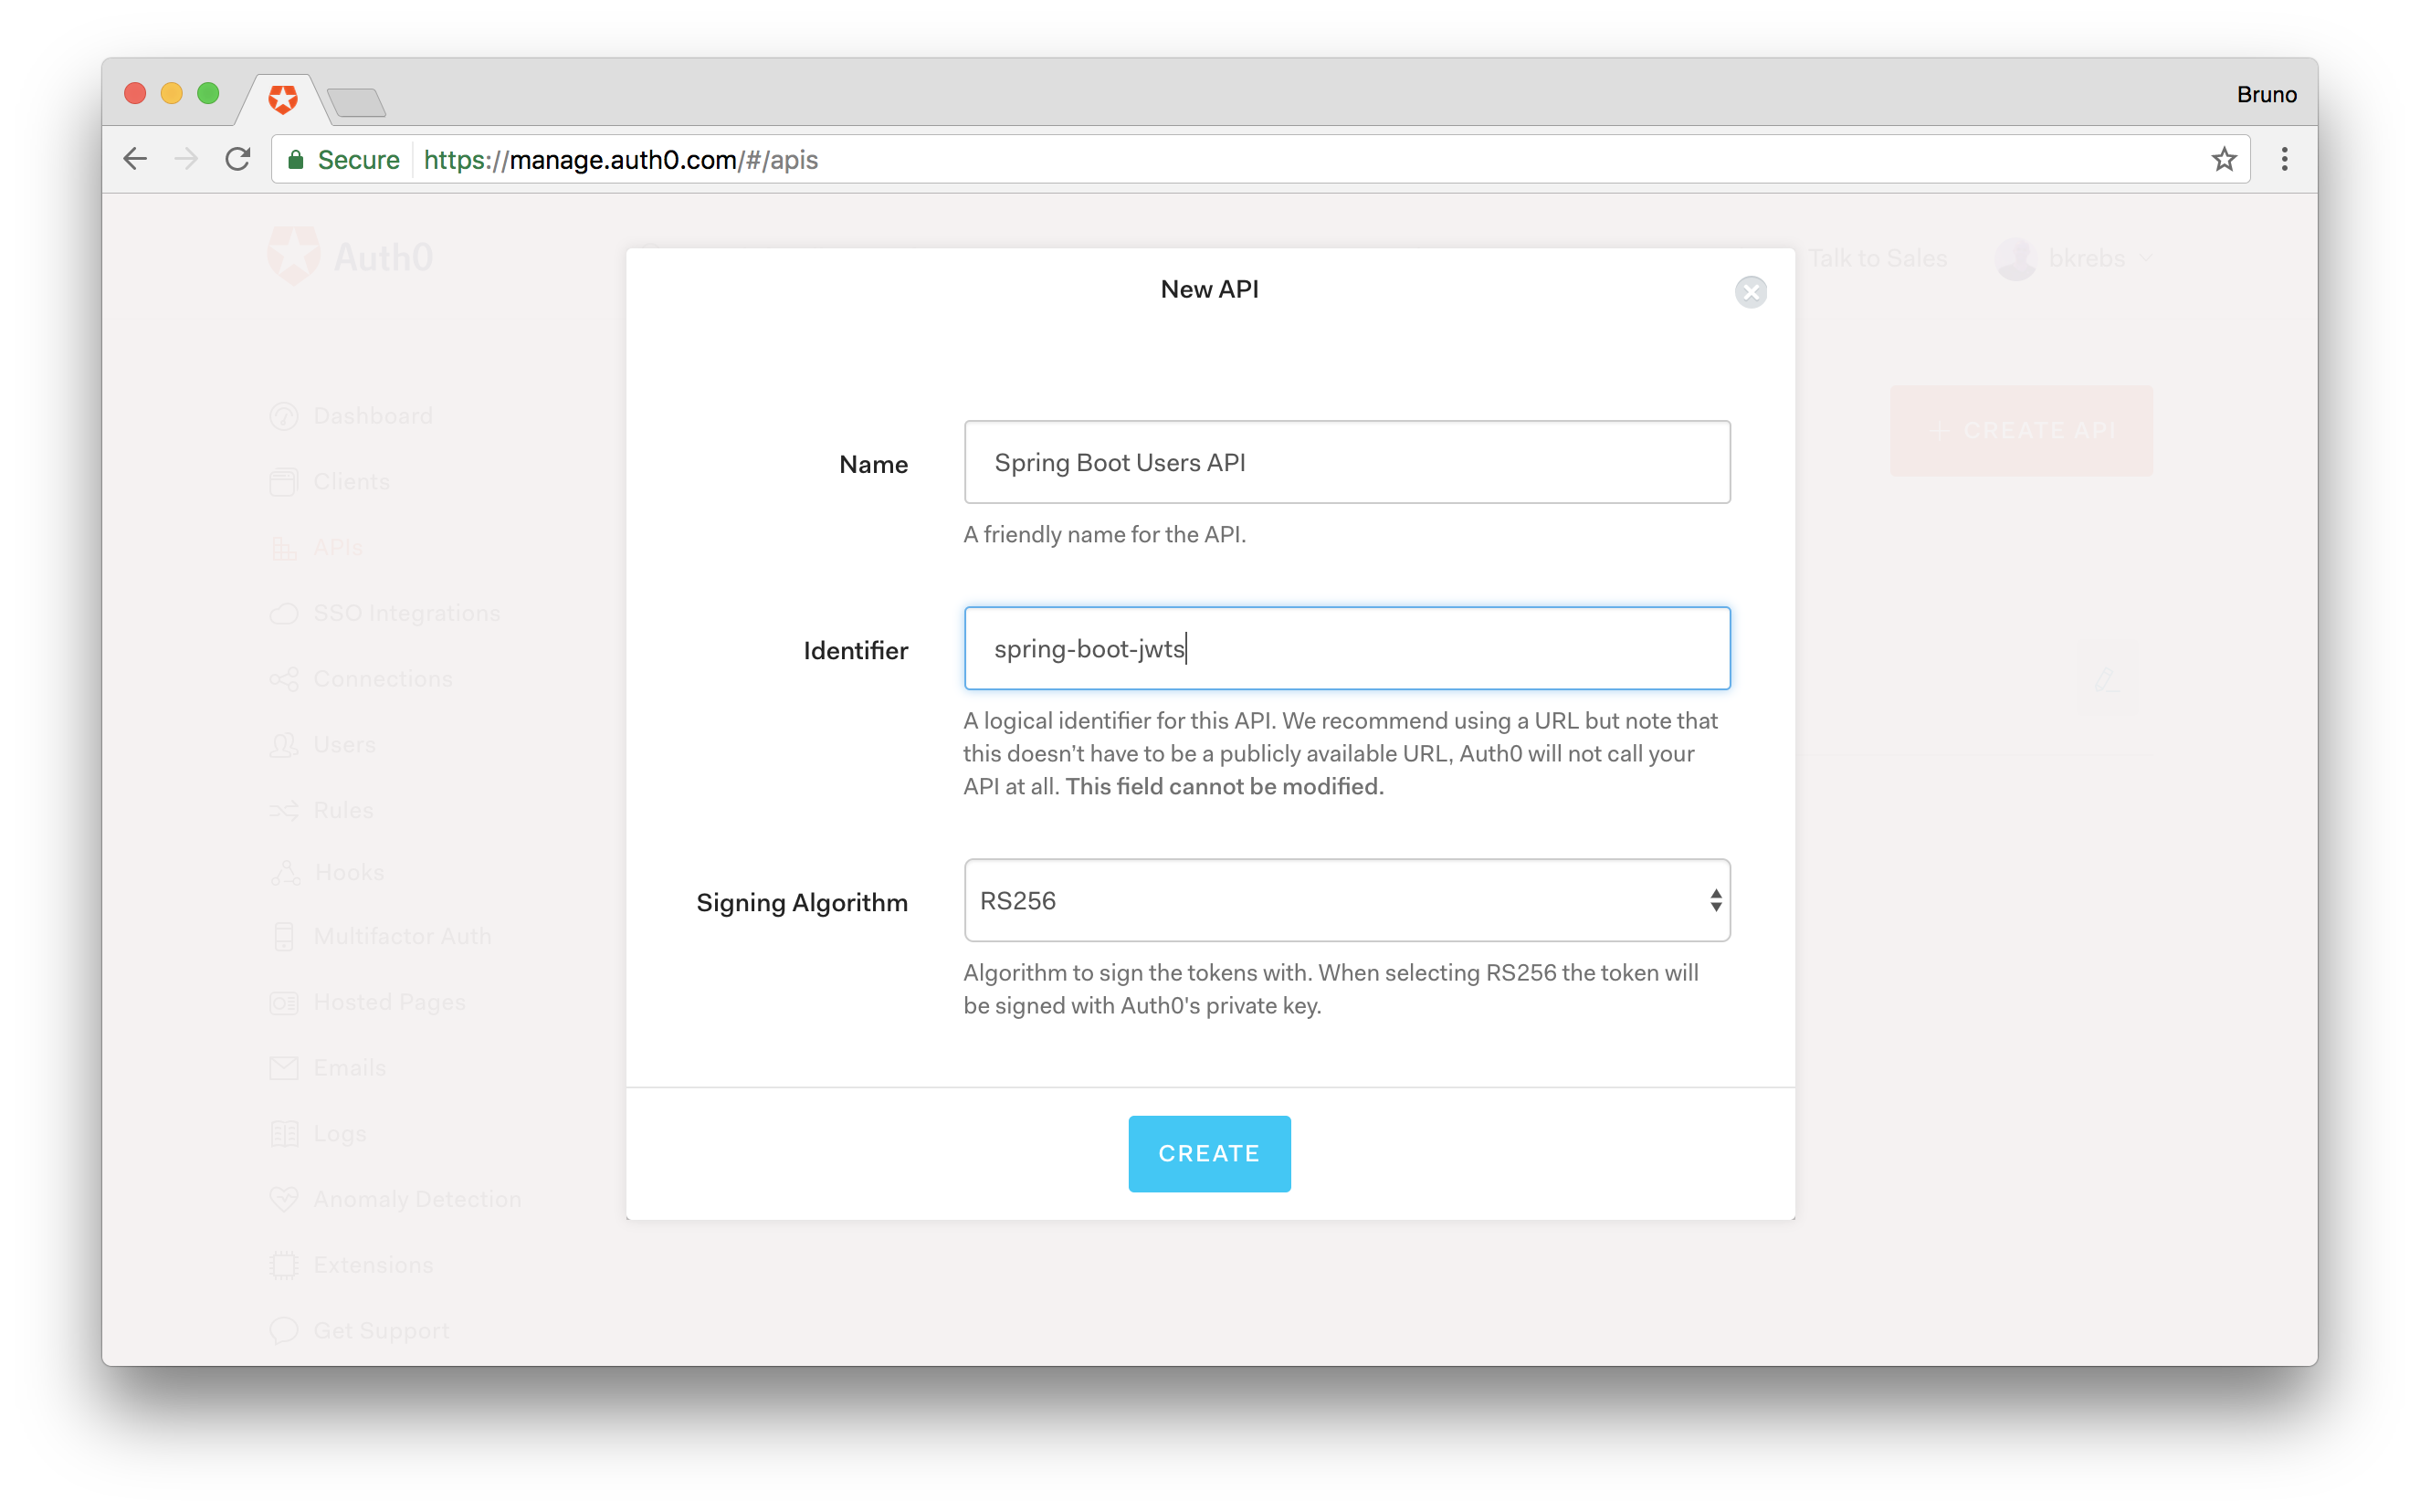
When creating an API, we must define three fields: Name, which is just a friendly name for our new API; Identifier, which is a String that we will use when requesting an access_token; and the Signing Algorithm, which defines if this API will use a symmetric or asymmetric algorithm to sign the access_token. In our case, we will fill this fields, respectively, with: Spring Boot Users API; spring-boot-jwts; and RS256 (i.e. we will use an asymmetric algorithm).
Auth0 supports different OAuth 2.0 flows to request access tokens. In our particular case, to keep the example simple, we are going to use the APIs & Trusted Clients flow. Keep in mind that this flow, although being the easiest one to implement, is the less secure one and must be used only when the the client application is absolutely trusted. Most situations will require other flows, and the "Which OAuth 2.0 flow should I use?" article on Auth0 can help on deciding which is the best approach.
To use the APIs & Trusted Clients flow, we must first configure the Default Directory property on our Auth0 account. To do so, head to the Account settings page and add Username-Password-Authentication as the value of the Default Directory property.
Changes to the Project
Since we are now using Auth0, we don't need to issue the JWTs ourselves anymore, so there is one dependency that we can remove and a few classes also. All the changes that are required can be found on the auth0 branch on GitHub. But we will go through the changes now.
First, let's remove the classes that we don't need anymore. Remove all the files in this list:
-
src/main/java/com/example/security/AccountCredentials.java -
src/main/java/com/example/security/JWTAuthenticationFilter.java -
src/main/java/com/example/security/JWTLoginFilter.java -
src/main/java/com/example/security/TokenAuthenticationService.java
And then we remove the following dependency from our pom.xml file:
<dependency>
    <groupId>io.jsonwebtoken</groupId>
    <artifactId>jjwt</artifactId>
  <version>0.7.0</version>
</dependency>
Now, under ./src/main/resources, there is a file called application.properties. This file needs to be populated with data from your Auth0 account. By default, when creating a new account you will have a "Default App", which you could use for this. These are the important parts of that config, so remember to replace the values with the values of your application:
# spring-boot-jwts is the identifier of the API that we just created
auth0.audience=spring-boot-jwts
# replace YOUR-DOMAIN to get something like https://bkrebs.auth0.com/
auth0.issuer=https://YOUR-DOMAIN.auth0.com/
Before we jump into the code, we need to add some dependencies to Maven.
<dependency>
  <groupId>com.auth0</groupId>
  <artifactId>auth0</artifactId>
  <version>1.0.0</version>
</dependency>

<dependency>
  <groupId>com.auth0</groupId>
  <artifactId>auth0-spring-security-api</artifactId>
  <version>1.0.0-rc.2</version>
</dependency>
Once we've done this, let's replace the source code of the WebSecurityConfig class, under the ./src/main/java/com/example/security/WebSecurityConfig.java file, with the following:
package com.example.security;

import com.auth0.spring.security.api.JwtWebSecurityConfigurer;
import org.springframework.beans.factory.annotation.Value;
import org.springframework.context.annotation.Configuration;
import org.springframework.security.config.annotation.web.builders.HttpSecurity;
import org.springframework.security.config.annotation.web.configuration.EnableWebSecurity;
import org.springframework.security.config.annotation.web.configuration.WebSecurityConfigurerAdapter;

@Configuration
@EnableWebSecurity
public class WebSecurityConfig extends WebSecurityConfigurerAdapter {
  @Value("${auth0.audience}")
  private String audience;

  @Value("${auth0.issuer}")
  private String issuer;

  @Override
  protected void configure(HttpSecurity http) throws Exception {
    http.authorizeRequests()
        .antMatchers("/").permitAll()
        .antMatchers("/users").authenticated();

    JwtWebSecurityConfigurer
        .forRS256(audience, issuer)
        .configure(http);
  }
}
There we have it, this was all that's required to use Auth0 with Spring Boot. We can jump into testing this application now, once again with Postman or a tool like curl. So let's run the application:
mvn spring-boot:run
Before getting an access token to issue requests to our API, we first need to create a new user on Auth0. To do that we have to issue a POST request, which requires a Content-Type header with application/json, to https://bkrebs.auth0.com/dbconnections/signup with the following JSON body:
{
  "client_id": "hfs2An7Zka9OPbXs0CRpmmmL33IKy4mA",
  "email": "user@test.com",
  "password": "123123",
  "connection": "Username-Password-Authentication"
}
After that we can get an access token. For that we need to issue a POST request to https://bkrebs.auth0.com/oauth/token that contains a JSON object in the body, which also requires a Content-Type header with application/json, that looks like:
{
  "grant_type":"password",
  "username": "user@test.com",
  "password": "123123",
  "audience": "spring-boot-jwts",
  "client_id": "hfs2An7Zka9OPbXs0CRpmmmL33IKy4mA",
  "client_secret": "Hx4eFNAT8TI2POIWXhxWDJ8vWpZxt79DQYUl7e898Uw0ASfc7eY42zPf2H-Gv1n1"
}
The client_id and client_secret properties, on both requests, must be changed properly. Their values can be found in the Spring Boot Users API (Test Application) application that Auth0 created for us. Head to the Applications page to get them.
Issuing this last request will give us an access_token. We will use this token in the header of the GET request that we will send to our Spring Boot API, in a similar manner to how we did it before. Now if we query our endpoint again, we get a list of the users. As we see, integrating Auth0 with Spring Boot is an easy process!
Conclusion
Creating a project with Spring Boot makes development a lot easier. We can save a lot of time otherwise spent on dealing with configuration and deployment, which are now taken care of for us. We can add a great deal of functionality to our project by including another dependency in our pom.xml, and all this gets bundled into one self-contained, easily-deployed application. As you can tell from the start of this project, there is a lot more to explore with Spring Boot, so what are you waiting for? ;-)