Native Extension for Node.js
https://www.nan-labs.com/blog/native-extensions-for-nodejs/
If you are a Spanish reader you can read this post in Spanish here: Extensiones Nativas: ¿dónde empezar?
In this article we will talk about the most important concepts to develop native extensions for NodeJS. Later, I will show how to build our first native extension with a practical example. And finally, I will leave some links to read more about it.
The basics to get started with native extensions
In simple terms, we can say that a native extension is a set of C++ implemented logic that can be invoked from JavaScript code.
At this point, it’s interesting for us to clarify how NodeJS works and which are the parts involved in it. It’s important to know why we can talk about two languages (JavaScript & C++) under the NodeJS context.
I like to explain it this way:
- JavaScript: it’s the coding language.
- V8: it’s the engine that runs our JavaScript code.
- Libuv: it’s a C library that provides us with asynchronous execution.
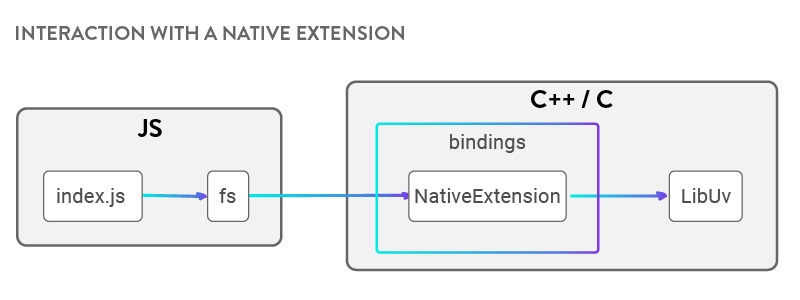
Now, where can we place native extensions? I will choose write/read disk action as an example to explain it. Neither JavaScript nor V8 provides us with disk access. Libuv provides asynchronous execution. But, with NodeJS we can write/read to disk, right? Well, this is the point where native extensions get into the match. The fs module is implemented using C++ (it has disk access) and eventually exposes methods (like writeFile and readFile) which can be invoked from JavaScript.

Once we have learned this, we can start taking our first steps in native extensions. Let’s talk about the tools we need.
Basic tooling to build a native extension
Binding.gyp file
This file allows us to specify how we need to compile our native extension. One of the main thing that we need to define are the files that will be compiled and how we will call the final binary. It has a JSON like structure, and the keys to get this configured are sources and target.
Node-gyp
It’s the tool that allows us to compile our native extension. It’s implemented in NodeJS and it’s bundled with npm so we can just run npm install and that will compile our native extension. When we run npm install, it will detect our binding.gyp file included in our root folder and then it will start compiling.
Also, it allows us to make release(default) or debug builds. As a result, a binary file with .node extension will be created inside a release or debug folder, depending on how it was configured.
Bindings
It’s a NodeJS package which allows us to export our native extension. It’s in charge of searching in a build or release folder for us.
N-API
It’s C API that allows us to interact with our engine in a completely abstract way. For me, it’s the result of an evolution that tries to port node to different architectures.
N-API provides stability and compatibility between different node versions. That is, if my native extension is compiled to node 8.1, I don’t need to compile it again for node 8.6 or 9.3. Thus making the life of the maintainers and contributors easier.
At this moment, N-API is under experimental state.
Node addon api
This NodeJS module provides us with a C++ implementation of N-API and allows us to use the language advantages.
First steps in the native extension world
Note: For this example, I used node 9.3.
To get initiated on the native extension world we will use the classic hello world example. The idea is to not overload the code with extra logic so we can focus on the minimum necessary code.
We start initializing npm so that we can then install our dependencies:
npm init
Now, as we said, we install our dependencies:
npm i node-addon-api bindings
At this point we need to create our C file with our logic:
#include <napi.h>

Napi::String SayHi(const Napi::CallbackInfo& info) {
  Napi::Env env = info.Env();

  return Napi::String::New(env, "Hi!");
}

Napi::Object init(Napi::Env env, Napi::Object exports) {
    exports.Set(Napi::String::New(env, "sayHi"), Napi::Function::New(env, SayHi));
    return exports;
};

NODE_API_MODULE(hello_world, init);
view raw hello_world.cc hosted with ❤ by GitHub
This file has three important parts that will be explained from bottom to top:
- NODE_API_MODULE (Line 14): The first argument is the native extension name and the second one is the name of the function that initializes our extension.
- Init (Line 10): This is the function that will initialize our native extension. In this function we must export the functions that will be invoked from JavaScript code. To do this, we need to set the name of the function to the exports object and the function itself that will be invoked. This init function must return the exports object.
- SayHi (Line 3): This function is what will be executed when we invoke our native extension from our JavaScript.
Later, we need to create our binding.gyp file that will contain our native extension configuration:
{
  "targets": [
    {
      "cflags!": [ "-fno-exceptions" ],
      "cflags_cc!": [ "-fno-exceptions" ],
      "include_dirs" : [
        "<!@(node -p \"require('node-addon-api').include\")"
      ],
      "target_name": "hello_world",
      "sources": [ "hello_world.cc" ],
      'defines': [ 'NAPI_DISABLE_CPP_EXCEPTIONS' ]
    }
  ]
}
view raw binding.gyp hosted with ❤ by GitHub
Finally, the JavaScript code that will require our extension and invoke it.
const hello_world = require('bindings')('hello_world')

console.log(hello_world.sayHi());
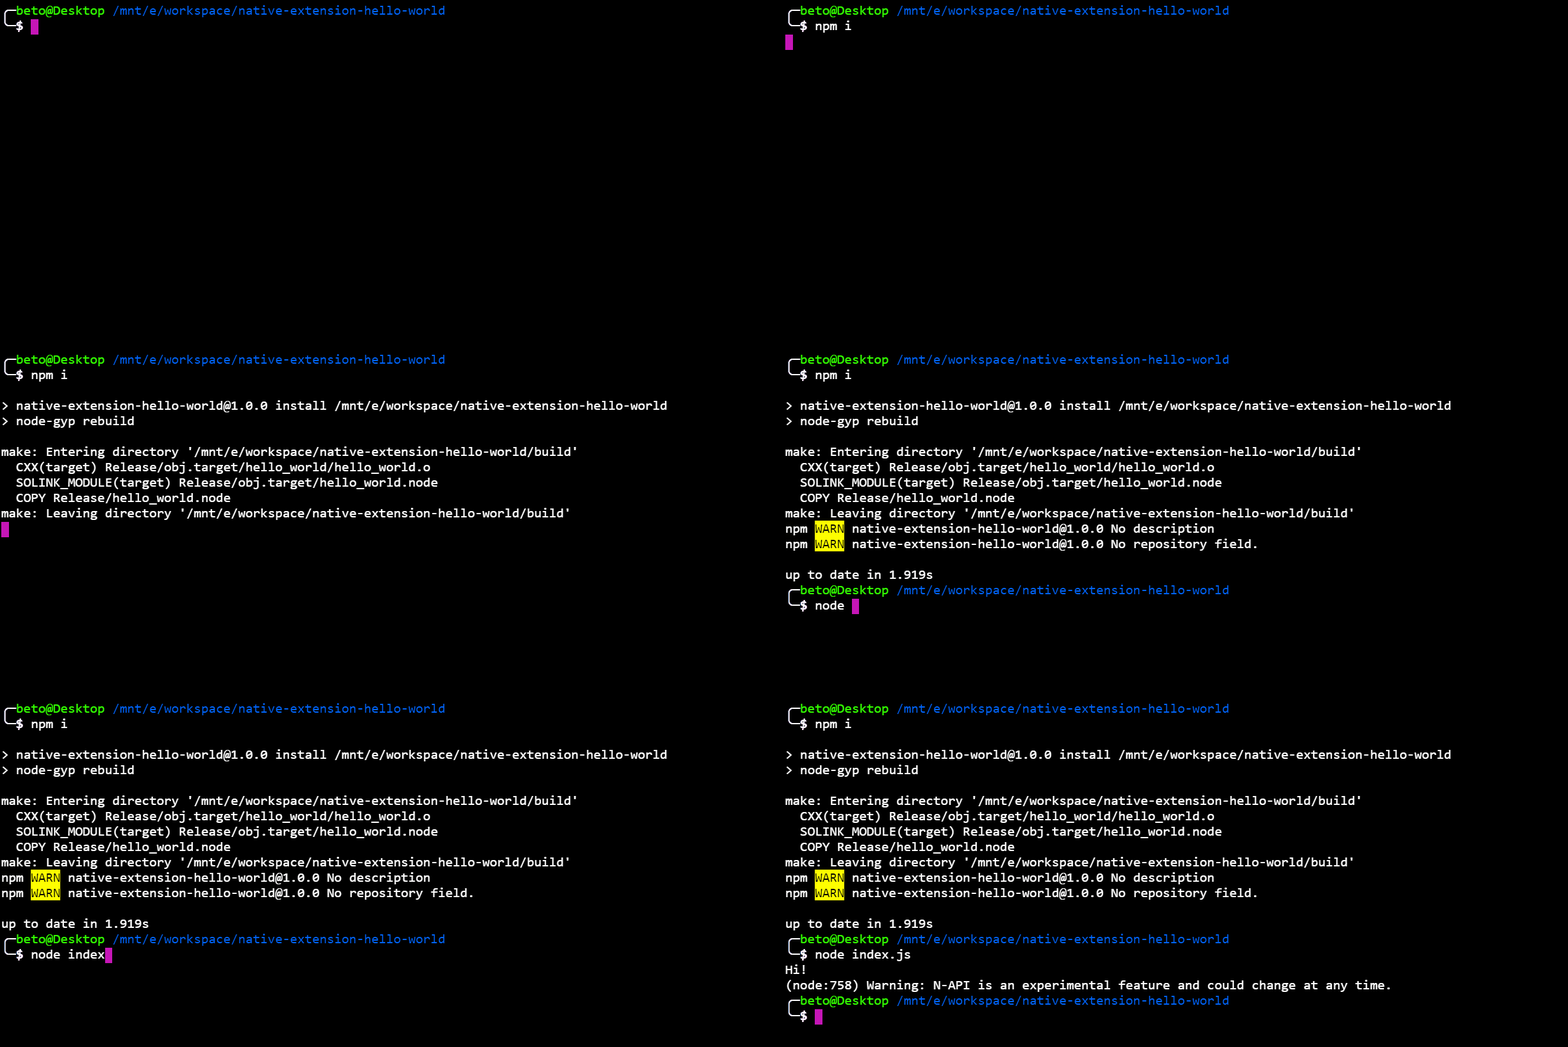
Now, we just need to compile our extension running npm install and run the JavaScript file that is used:

And that’s it. We just run our native extension.
What we had before N-API?
I find it important to know the context and history of native extensions since it gives access to a lot of documentation and examples. The idea is for N-API to eventually replace NAN. For that reason we should look back to NAN for a moment.
NAN? Yes, Native Abstraction for Node.js. NAN is a C++ library that provides us with V8 abstraction, but it doesn’t allow us to abstract ourselves from the V8.
In new NodeJS releases, there could be V8 changes that could break our native extension. Using NAN is a way to avoid this problem.
Further steps to develop your native extensions
As I said, knowing about NAN allows us to learn from its examples and documentation. It’s a good complement to our native extension learning process.
- NAPI examples can be found in here.
- Node-addon-api examples can be found in here.
- Nan examples can be found in here.
- Another good source are tests here.
- To learn more about native extensions here.
Conclusion
Learning about native extensions helped me to understand how NodeJS works and how it’s composed. There are more than one scenario where we can use them, such as performance boosts, C/C++ library integrations, or integration with legacy code.
In summary, it’s an excellent way to learn about NodeJS internals.
If you have any doubt, please post a comment and I will help you.
Taking part in the community
I made this post for a contribution to LaPlataJS. It’s a local JavaScript community where I participate helping with talks, events organization, or posts. I think that whenever you can you should join a community. For me, it has a lot of benefits. You can know really good people, share ideas, learn things and, sometimes, go for a beer with your folks.
Copyright © 2015 Powered by MWeb, Theme used GitHub CSS.
